Style: Scrap Scarf
At last, a use for all those tiny scraps you’ve been saving! Pull out your bags of ribbon bits, leftover strands of yarn, and those glitzy threads you’ve been afraid to try. If you have a stray button or bead that hasn’t found a home, get it out too.
Our scrap scarf project uses a technique often called “free lace”, temporarily adhering odds and ends to a water soluble substrate and then sewing them together. Using this technique, you can make an interesting scarf or other piece of fabric without having to knit or crochet. The only skills you’ll need are gluing, cutting, and sewing on a sewing machine – and you don’t even have to be able to sew straight.
Supplies
- Bits of yarn, ribbon, fabric, Angelina, other fibers. Note: don’t use anything which can’t be sewn over or which would damage a sewing machine needle.
- Embellishments such as beads, buttons, fancy thread.
- Thread
- Mokuba scarf sheets OR Wash Away Extra OR a combination of Sulky Solvy and Sulky KK2000 adhesive.
The Mokuba system and Wash Away Extra are water soluble sheets pre-coated with adhesive. They’re convenient, easy to use, and will save you the risk of breathing the solvents in spray adhesive. However, using a combination of Sulky Solvy and Sulky KK2000 spray adhesive will allow you to spray each layer of material you add, allowing you to make a denser scarf. If you do use the Sulky combination, it will need to be sewn within a few days since the adhesive gradually evaporates.
|
|
|
|
 |
|
Making the scarf
If using spray adhesive, protect your work surface with newspaper or butcher paper
Cut your substrate to the desired length and width. If using an adhesive-backed substrate, place it adhesive side up on your work surface. If necessary, overlap pieces of substrate to create a larger one.
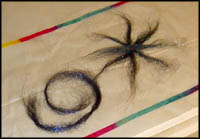
Lay down ribbon or yarn on the substrate (which is invisible in our photo) to define the edges of your scarf. Begin adding the materials you want to see on the outside, always laying them face down.
In the photo at left, we’ve added shapes created from fusible Angelina fibers, a colorful sparkly material that fuses together to make fabric when ironed at low temperatures. |
|
|
|
 |
|
Next we lay down strands of yarn. You don’t have to place the yarn in straight lines; feel free to try swirls, loops, or squiggles instead. You could also use ribbon in place of yarn, or clumps of unspun fibers.
|
|
|
|
 |
|
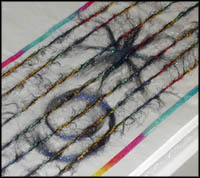
Here we’ve added small scraps of velvet, satin, and lamé left over from making a crazy quilt. These scraps were so sensuous that we couldn’t bear to throw them away, and this is a good way to put them to use.To ensure the textures can be appreciated in the finished scarf, place the fabric scraps face down.Fabric pieces will fray over time, adding to the texture of the scarf. Protect any precious motifs from ruin by backing them with substrate (stray bits of Solvy will do), then satin stitching around their edges either before or after adding them to the scarf. (A satin stitch is simply a shortened zigzag stitch, where the stitches take on a satiny appearance because they’re close together.)If desired, leave four or five inches of unembellished yarn/ribbon strands at each end of the scarf to form a fringe in the finished project. |
|
|
|
 |
|
More of the colorful ribbon has been added. It’s starting to look as though a crayon-making machine threw up. |
|
|
|
 |
|
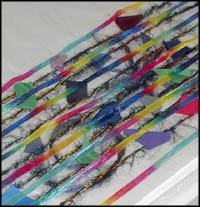
Next we spray on some fabric adhesive and add more fabric snippets, this time face up so they can be appreciated from the other side of the scarf.
It’s decision time. We could stop adding materials now and have a scarf that’s open and airy-looking … naw. When has Tacky Living ever shown restraint in its projects?
|
|
|
|
 |
|
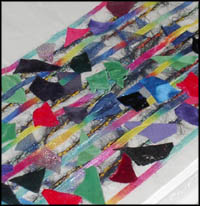
At left, we’ve spritzed on more adhesive and added even more yarn.Again, don’t feel like you have to lay your yarn or ribbon in straight lines just because we did. Be bold. Have some fun. If you don’t like what you see, you can always pull it apart and rearrange it |
|
|
|
 |
|
More Angelina shapes are added to the scarf. |
|
|
|
 |
|
Next, we spray adhesive over the entire scarf, lay down another layer of Solvy, and mash the layers together with a rolling pin. If you use Solvy as we did, you may be able to iron it and temporarily fuse the “sandwich” together, a method we didn’t experiment with.If you’re using an adhesive-backed substrate, be sure to lay it on your scarf adhesive side down |
|
|
|
 |
|
Pin through all of the layers to be absolutely that they don’t come apart. The adhesive may be strong enough to hold the scarf together, but who wants to take a chance on it falling apart during the sewing process?At left, some fringe ends of yarn and ribbon are left exposed at the end of the Solvy.
Now the hard work begins: sew a 1/4″ – 1″ grid of thread over the entire scarf, except for the fringe. We had lots of little fabric bits, so we used a half inch grid, then sewed random squiggles to ensure that we captured all of the fabric pieces. We used a clear monofilament thread so that our stitching wouldn’t be visible.
Finally, using decorative threads, we sewed a satin stitch around each piece of satin or velvet that was visible on the surface of the scarf. This added a bold geometric touch to the project.
If you’re using the sewing machine to add beads or other embellishments, this is a convenient time to do it.
When you’re satisfied, soak your scarf in water to remove the substrate. If you discover displeasing holes after doing this, dry the scarf, pin substrate over the holes, and cover the holes with more stitching.
|
|
|
|
 |
|
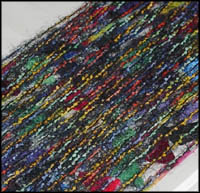
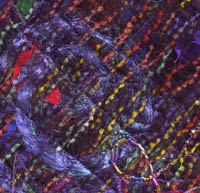
Here’s a closeup of our scarf after soaking the stabilizer off. Not being patient souls, we sent the scarf on a brutal trip through the washer and dryer, being careful to use low heat so as to not sear the color out of the Angelina.Note the beaded embellishment in lower righthand corner. This was created by filling a bowl with small beads, then mindlessly jamming a threaded needle through the bowl over and over again while watching TV. It’s amazing how quickly a needle will get filled that way, and it’s much less excruciating than carefully placing each bead on the needle by handAfter making the strand of beads, we attached it to the scarf with a zigzag stitch, using a darning foot while the feed dogs on our machine were lowered. Hand feed the cloth through the machine when doing this and be careful not to break a needle on the beads. |
|
|
|
 |
|
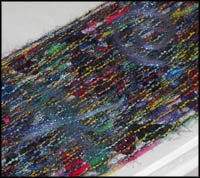
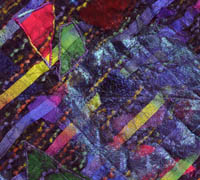
Here’s a closeup of the other side of the scarf. In the upper lefthand corner, one can see two pieces of velvet that have been satin-stitched to prevent unraveling and add stability as well as a bold decorative touch.
|
|
|
|
 |
|
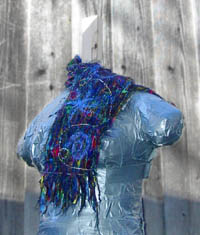
Helga the duct tape dummy models the scarf. (See how to make your own duct tape dressmaker’s dummy.) |
|
")


