|
 This is a great rainy day project, an antidote to the eternal whine “I’m bored!” and perhaps even the basis for a school science project. This is a great rainy day project, an antidote to the eternal whine “I’m bored!” and perhaps even the basis for a school science project.
You’ve probably seen commercially available marble mazes and runs in toy stores. There are some very nice ones available – Quadrilla’s marble railroads come to mind – but they come with equally “nice” prices. You could purchase one of those or, with a few minutes of work, you could make our version. (Even better, if your kids are old enough to handle a glue gun, turn them loose and let them do it themselves.) Ours isn’t as nice as a purchased maze, but it’s dirt cheap and it’s easy to make. You may even have the materials around the house already.
These mazes are also surprisingly sturdy. During a test run with the Tacky Living Test Toddler shown at right, who weighs about 35 pounds, he turned both examples upside down and stomped on them. Only two sticks were broken off; repairs were readily made with a few daubs of hot glue.
Supplies:
- Jumbo craft sticks – these are the wider, thinner “tongue depressor” style that measure approximately 3/4″ x 6″. We like these better than the standard “popsicle” style because they’re thin enough to cut with scissors and wide enough to retain the marbles. However, if you already have the smaller thicker type, why not give them a try and see how well they work?
- Glue gun, hot melt glue sticks
- Cardboard – we prefer to use corrugated cardboard since it’s stronger than the sheet variety. We cut ours from boxes.
- Scissors
- Utility or craft knife and a ruler for trimming – a utility knife is very useful for cutting sheets of cardboard from boxes. This may be a task best left to an adult.
- Marbles
|
 |
|
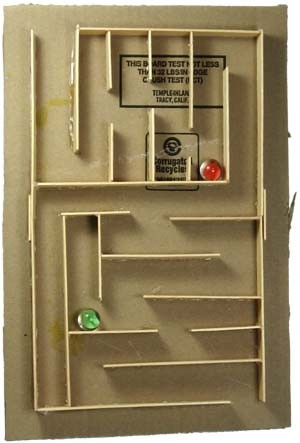
Marble Labyrinth
A fairly standard marble maze is shown at left; it’s held more-or-less horizontally and tilted to move the marble through. To make your own maze:
- Cut a sheet of cardboard. Ours is about the size of a sheet of paper, but you can make yours smaller or larger (even much larger!) if desired.
- Using scissors, cut the rounded ends off five or ten craft sticks. (You can cut more as needed.)
- Run a bead of glue along the long edge of one craft stick and press it to the cardboard.
- Add additional sticks to form the sides of your maze. If desired, you can leave gaps for the marbles to enter and exit the maze.
Tip: When you wish to have a long edge but the sticks aren’t long enough, glue two sticks to the board end to end. Reinforce them and cover the gap between them by smearing glue on a short piece of stick and pressing it over the gap. Two such reinforcements can be seen in the photo at left.
- Build out your maze by gluing additional sticks of different lengths to the cardboard.
Tip: Before pressing each stick into place, be sure you’ve left sufficient room for the marbles to roll.
- If you’re unhappy with the way a stick is positioned, you may be able to melt its glue with a hair dryer and reposition it.
- Wobbly sticks can be reinforced by running a bead of glue along each edge where it meets the cardboard.
Variations:
- Decorate the cardboard before gluing on the craft sticks.
- In order to avoid surprises, use a ruler to sketch your layout on the cardboard before beginning to glue.
- Glue a piece of thin, clear plastic over the top to make the maze self-contained. Sometimes you can salvage really thin plastic from product packaging. Thicker plastic such as acrylic is available at hardware and specialty stores.
|
| |
|
|
 |
|
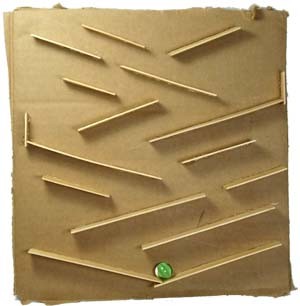
Marble Drop
This marble run is inspired by the ball drops often seen at science museums. When it’s held or leaned almost vertically, marbles can be dropped in from the top and will make their way to the bottom. To make your own:
- Cut a sheet of cardboard. Ours is about the size of a sheet of paper, but one that was much larger would be stunning.
- Using scissors, cut the rounded ends off five or ten craft sticks. (You can cut more as needed.)
- Cut the sticks into a variety of lengths.
- To glue a stick to the board, run a bead of glue along one edge and press it to the cardboard as shown in the photo at left.
- Build out your marble drop by gluing additional sticks of different lengths to the cardboard.
Tip: Before pressing each stick into place, try rolling a marble down the existing sticks to see where you might like a new one and to ensure that there’s enough space for the marbles to roll.
- Short vertical pieces can be glued on any ends where the marbles tend to fly out of the marble run.
- A pair of sticks glued in a wide “V” shape at the bottom will help catch the marbles after they fall.
|
|
")


[…] View details: DIY Easy Marble MazesSource: www.tackyliving.com […]