Travel & Leisure: The Trashcanulator 2000
Photography on a Shoestring
 The Trashcanulator 2000 is a macro photography aid based on a translucent white trash can. (I added the 2000 to the name because it sounds more pompous that way. I’m going to call it the T-2000 for short, though, simply because I’ve only typed the name once and I can already tell that typing it over and over again is going to get very tiresome.) The Trashcanulator 2000 is a macro photography aid based on a translucent white trash can. (I added the 2000 to the name because it sounds more pompous that way. I’m going to call it the T-2000 for short, though, simply because I’ve only typed the name once and I can already tell that typing it over and over again is going to get very tiresome.)
I was motivated to build the T-2000 when the need to take some close-up photos of small objects arose. I wanted to photograph these objects from directly overhead, which posed a problem as far as the lenses and tripods I currently have. I also wanted nice simple, ambient lighting with no hot spots, which suggested using a diffuser.
There are some very nice ready-made systems on the market that will do exactly what I want. For example, there’s the Cloud Dome, which consists of a translucent white acrylic dome topped with a camera mounting bracket. As of this writing, prices for basic systems start at $200. That isn’t bad as photography equipment goes.
There are also places like GPSI that sell white acrylic domes in a variety of diameters. These aren’t horribly expensive either – around $40 for one that’s 7″ high – and they look like they’d work well if you already had an appropriate camera mount (which I don’t). Here’s a photo of a GPSI dome in use.
These do look like nice systems. If money was not an issue, I’d run out and buy one tomorrow. However, once I start buying equipment, that’s usually exactly what it is – just a start. I find that things don’t work quite as I want them to and I “need” to buy more. Furthermore, there’s usually a cheaper, simpler way to do things if I just think a bit.
In this case, my gut reaction to some of the equipment – “that’s just an upside down salad bowl with a metal bracket bolted on it!” – and a stroll through Ikea got my brain going. In the cookware department, Ikea carried a set of three translucent white plastic mixing bowls (product name: Reda) for $5. Those looked promising: one could turn the biggest bowl upside down, drill a hole through the bottom to accept a lens, and devise a camera mounting bracket.
However, I didn’t know the shortest focal length of my lenses. I was concerned that sticking my camera on the bottom of even the biggest mixing bowl would put it too close to the object I was photographing for the camera to focus.
Happily, a stroll through the office supply section yielded another choice: a translucent white plastic wastebasket, the Fniss, which was taller than the mixing bowl. This was almost certainly taller than my shortest focal length, and although it was white it was translucent enough to allow some light in. Even better, it only cost $1.99. This wastebasket became the heart of the T-2000.
Sample photos
Here are some comparison photos taken with and without the T-2000.
|
|
|
|
 |
|
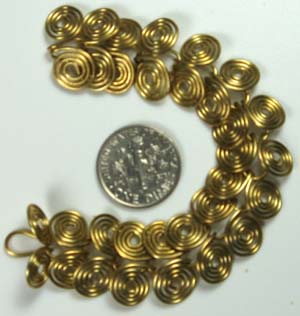
Without T-2000
This shot is slightly out of focus; I was having trouble holding the camera steady. The wire work appears shiny and has prominent shadows. |
|
|
|
 |
|
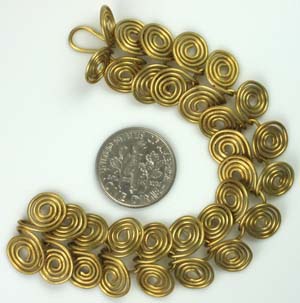
With T-2000
This shot is crisper. Since the T-2000 acted as a camera support, the shot is in focus. The trash can diffused the light, so highlights are subtle and more of the detail of the wire work can be seen.
These two photos were were taken with identical lighting: a desk lamp with a daylight-corrected 23 watt fluorescent bulb was placed on each side of the objects. Both shots came out somewhat dark, so I adjusted their levels in Photoshop. (In the future I may use an additional lamp.) No color correction or other retouching has been done.
The photo taken with the T-2000 is by no means perfect, but considering that the setup cost me less than $10 to build, it isn’t half bad.
|
|
|
The Trashcanulator 2000
Here’s a photo of the T-2000 itself. Elegant-looking, isn’t it? The trash can gives it a certain je ne sais quoi, I think.
|
|
Building your own
Should you wish to build your own, my materials list is below. My total cost for materials was in the $5-10 range. However, I had some scrap plywood and salvaged hardware on hand which minimized my costs. The materials list should be considered as a guideline only. With the exception of the camera-mounting screw, which is a standard 1/4 – 20 for most cameras, you should feel to substitute other materials.
Please note that the project as shown was designed for a small digital camera. If used with a larger, heavier camera such as an SLR, the trash can may tend to get off balance and tip over. In the future I may design a T-3000 or MixingBowl2000 to get around this issue. In the meantime, if you’re using a larger camera you may need to tweak the camera mount so the weight of the camera isn’t on the outer edge of the trash can.
Materials:
- one white/clear FNISS wastepaper basket (Cost: $1.99!!!)
- two 7 x 5″ scraps of 1/2″ thick plywood
- four 1″ long 1/4 x 20 metal screws for screwing plywood to waste basket (substitute other sizes/lengths if desired)
- one 3/4″ long 1/4 x 20 metal screw for camera mount
Optional: extra 3/4″ long screws, in case the primary mount screw ever gets lost.
- four 1/4 x 20 nuts
Optional: extra nuts to hold the extra mount screws on the plywood
- two or three 1/4″ washers for mount screw spacers
- two metal L brackets, 2″ on a side
- eight 1/2″ long wood screws with heads big enough to hold down L brackets
|
 |
|
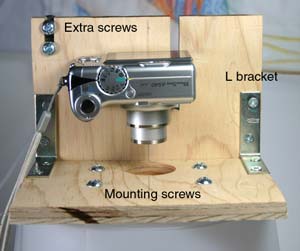
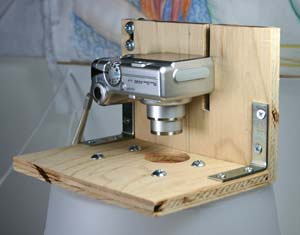
Here’s a photo of the front of the camera mount. |
 |
|
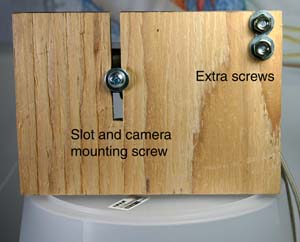
Here’s the back of the camera mount.
|
 |
|
Finally, here’s a 3/4 view, just to be pedantic about the matter:
|
|
The design process for the camera mount was by no means lengthy or elegant. You can probably tell how to build your own just from looking at the photos above. However, for the sake of posterity, here are the steps I followed:
- Decide which piece of plywood will be the support’s vertical and which will be the support’s horizontal.
- Mark a line through the center of the plywood vertical. The camera’s lens will be centered on this line. (In case my writing is unclear, this pencil line can be seen on the plywood in the first and third camera mount photos.)
- The camera should have a screw hole on its bottom which can be used to mount it to a tripod. It will probably be offset with respect to the lens. Hold the camera against the plywood vertical, centering the lens on the line you drew in the previous step. Mark a second line on the plywood to show the center of the screw hole.
- Cut a 1/4″ wide slot centered on the screw hole line you just drew. The camera mount screw will fit in this slot. I used a band saw to cut my slot and made it 3″ long, but there’s nothing special about the 3″ measurement.Optional: Cut a second 1/4″ wide slot on the other side of the plywood for holding extra camera mount screws.
- Now it’s time to work on the horizontal piece. On the horizontal board, mark a set of crosshairs to show lens center. (You’ll probably need to position the camera on the vertical board to do this, then compare the horizontal board to the vertical one. Take heart; it’s much easier than my writing makes it sound.)
- With a hole saw, cut a lens hole in the horizontal board. The center of the hole will be at the crosshairs you just marked. The hole should be big enough that your lens can go through it, in case the camera ever bumps against the plywood. (For my small digital camera, a 1 1/2″ diameter hole was sufficient.)
- While you have your hole saw out, drill a matching lens hole in the center of the plastic trash can’s bottom.
- Turn the trash can upside down and place the horizontal board on top of it. Align the lens holes in the plywood and trash can, then mark and drill holes in the horizontal board and the trash can bottom so the two can be screwed together. Since I used 1/4-20 screws, my holes were 1/4″ wide. You may wish to space your holes a little more evenly across the board than the ones shown in my photo. Some of my “design” (cough-cough) was done on the fly with a drill in hand.
- Screw the vertical and horizontal boards together with the metal L brackets and wood screws. Your camera mount is now complete.
- Using metal screws and nuts, screw the camera mount and trash can together.
- Your camera can now be attached to the mount with the 3/4″ long 1/4 x 20 screw. Thread a washer or two on the screw if the screw bottoms out or the camera is “floppy” on the mount. The goal is to get a nice snug fit without risking damage to the camera.
To use your new T-2000, place the object to be photographed on a flat surface and place the T-2000 over it. Shine lights on the outside for illumination. If your images come out a little dark, add more lights. (Of course, an image-editing program such as Photoshop is always helpful as well.)
The T-2000 should work well and give you years of cheap, faithful service. However, if you aren’t satisfied with it, you can always unscrew the camera mount, duct tape over the holes in the trash can, and throw garbage in it.
|
|
")


