You’re at a fine street cafe in Paris on the left bank. The weather is lovely, your companion attractive and attentive. Life is perfect. The waiter delivers food to you with a flourish. “Poulet rôti et Pommes Frites,” he states.
“Tabasco?” you inquire.
The waiter shakes his head curtly. “Non!”
Not to worry. You are prepared. You pull out your condiment keeper and extract a packet of your favorite hot sauce. Your companion and even the tourist-jaded waiter look on in admiration.
“It’s marvelous! Where could I get one?” sighs your companion. “C’est bon,” agrees the waiter.
You modestly bow your head before admitting “I made it myself from common household materials like newspaper and glue.”
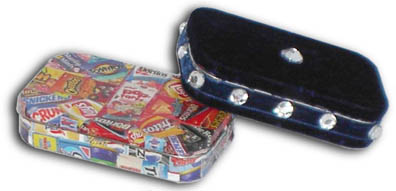
Based on a mint tin, these condiment keepers are the perfect size to tuck in a pocket, purse, or briefcase. Best of all, they’ll hold several packets of your favorite fast food sauce without letting it get squashed.
Of course, you could simply put your condiments directly in a plain mint tin, but when embellishment is so easy and stylish, why not go the extra mile? We’ve shown two of our favorite ideas. We’re betting you’ll have more.
Junk Food Mandala:
Celebrate your love of junky food with this mobile shrine. To make it:
- Cut out small junk food photos from coupons and advertising circulars.
- Arrange them in a pleasing pattern and decoupage them on a mint tin.
- Apply several layers of decoupage medium to protect the images.
Diamonds and Velvet:
Make a condiment keeper to match your evening wear!
- Cut two rectangles of stretch velvet to fit over the top and bottom of a mint tin, plus 1/4″ extra on each edge.
- Center the fabric over the top and bottom of the tin and glue it down.
- Wrap the extra fabric around the edges and glue it down, trimming it as necessary around the hinges and tin opening.
- Glue a strip of matching velvet ribbon around the sides to hide the raw edges. Hint: you may wish to leave the hidden edge of the tin bare so that it will close easily.
- Glue rhinestones to the top and sides.


